Archive
This post is archived and may contain outdated information. It has been set to 'noindex' and should stop showing up in search results.
This post is archived and may contain outdated information. It has been set to 'noindex' and should stop showing up in search results.
How-to: Animated gif in Adobe Photoshop CS3
Aug 24, 2010WindowsComments (1)
With CS3, Adobe incorporated features from ImageReady into Photoshop, so you can now create animated gifs completely inside Photoshop. Here's how:
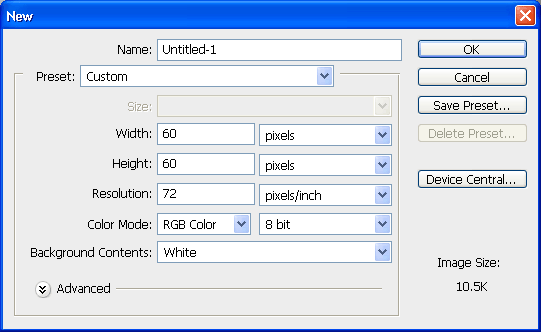
Step 1. Create a new document. I made mine 60 x 60 pixels, but you can make yours whatever size you would like for your animation.
Step 2. Create or add the frames of your animation, each on its own layer. I am creating a loading icon that spins in 30° increments, so I have 12 layers that each contain a different frame of my animation.
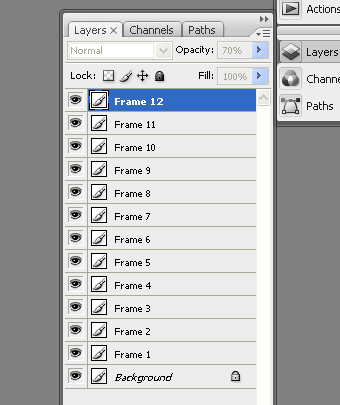
Notice I kept the background layer as well. This is because each of my layers is semi-transparent and I want to have a white background.
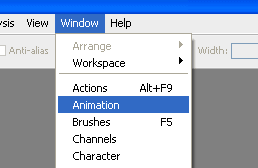
Step 3. Now open the Animation Window.
And in the animation window, click the drop-down arrow in the upper-right and select Make Frames From Layers.
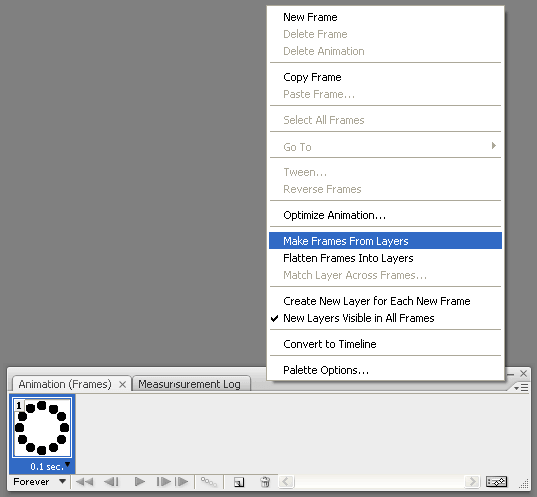
Here is what you will get:
Each layer is put into its own frame. If you click each of the frames you will notice in your layers window that it hides and unhides each layer corresponding to each frame. Think of each frame as a different state of your document. You can hide or unhide layers in each frame to change each individual frame.
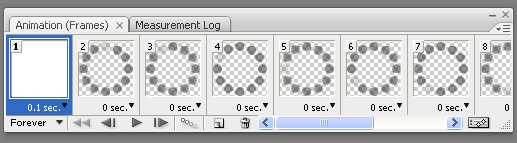
If you're making a loading icon like I am, you will probably want to remove frame 1, since it's just the white background. Drag it to the trash in the Animation window (not the Layers window!). You will also notice that each of your frames doesn't have a background, so we need to unhide the background layer in each frame. You can do this easily by selecting frame 1 and then shift-selecting the last frame. Once all the frames are selected, unhide the Background layer in your Layers window.
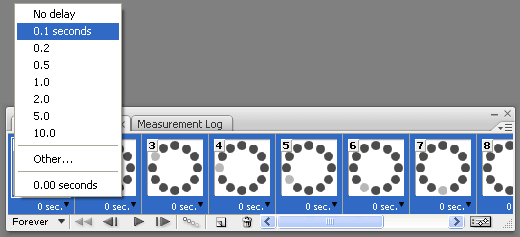
Now with the frames all still selected in your animation window, click the drop-down arrow on one of them to adjust the delay to your desired speed. I chose 0.1 seconds. It should look like this (also notice how each of the frames now has a white background):
Lastly, adjust the number of repeats if you want. I have mine on Forever, so the animation will continually loop.
Step 4. Now that your animation is done, you need to save it as a gif. I prefer to use the Save for Web option, which is under the File menu. Select GIF and then save it. You should have a completed animation. Here is mine:

Here is another one I did. For this one I chose 0.05 as the delay, which is not compatible with all browsers. Some browsers won't run animated gifs faster than 0.1 second delay, so depending on your browser and computer, this animated gif may be running smoothly or roughly. I recommend sticking to 0.1 second delay or slower for this reason.

Feel free to use either of the above animated gifs in your own web projects.
Step 1. Create a new document. I made mine 60 x 60 pixels, but you can make yours whatever size you would like for your animation.
Step 2. Create or add the frames of your animation, each on its own layer. I am creating a loading icon that spins in 30° increments, so I have 12 layers that each contain a different frame of my animation.
Notice I kept the background layer as well. This is because each of my layers is semi-transparent and I want to have a white background.
Step 3. Now open the Animation Window.
And in the animation window, click the drop-down arrow in the upper-right and select Make Frames From Layers.
Here is what you will get:
Each layer is put into its own frame. If you click each of the frames you will notice in your layers window that it hides and unhides each layer corresponding to each frame. Think of each frame as a different state of your document. You can hide or unhide layers in each frame to change each individual frame.
If you're making a loading icon like I am, you will probably want to remove frame 1, since it's just the white background. Drag it to the trash in the Animation window (not the Layers window!). You will also notice that each of your frames doesn't have a background, so we need to unhide the background layer in each frame. You can do this easily by selecting frame 1 and then shift-selecting the last frame. Once all the frames are selected, unhide the Background layer in your Layers window.
Now with the frames all still selected in your animation window, click the drop-down arrow on one of them to adjust the delay to your desired speed. I chose 0.1 seconds. It should look like this (also notice how each of the frames now has a white background):
Lastly, adjust the number of repeats if you want. I have mine on Forever, so the animation will continually loop.
Step 4. Now that your animation is done, you need to save it as a gif. I prefer to use the Save for Web option, which is under the File menu. Select GIF and then save it. You should have a completed animation. Here is mine:
Here is another one I did. For this one I chose 0.05 as the delay, which is not compatible with all browsers. Some browsers won't run animated gifs faster than 0.1 second delay, so depending on your browser and computer, this animated gif may be running smoothly or roughly. I recommend sticking to 0.1 second delay or slower for this reason.
Feel free to use either of the above animated gifs in your own web projects.