Archive
This post is archived and may contain outdated information. It has been set to 'noindex' and should stop showing up in search results.
This post is archived and may contain outdated information. It has been set to 'noindex' and should stop showing up in search results.
Set up Apache, PHP, and MySQL on Windows
Sep 26, 2011ProgrammingComments (0)
This guide is outdated now and only good for Apache 2.2 and PHP 5.2. To use newer versions, you may want to consider WAMP.
Here's a basic guide on setting up an Apache server with PHP and MySQL on your Windows computer to use as a developer environment.
If you currently have IIS setup with MySQL, you can leave MySQL installed. You will want to remove IIS prior to installing Apache though. It would require configuring beyond the scope of this guide to use both IIS & Apache concurrently. To remove IIS, you will want to choose the "Add/Remove Windows Components" or similar link on your respective version of Windows, which would be in the "Add/Remove Programs" or "Programs and Features" control panel.
If you have PHP currently with IIS, you may also be able to leave it installed (and just reconfigure it using the original installer), but it is likely that the version you originally downloaded for IIS won't be the best one to use for Apache, or you may not have the installer anymore. I suggest uninstalling PHP and starting fresh.
Now to the setup:
Download the latest Windows release of the server from the Apache download page. You'll probably want the one called Win32 Binary without crypto (no mod_ssl) (MSI Installer).
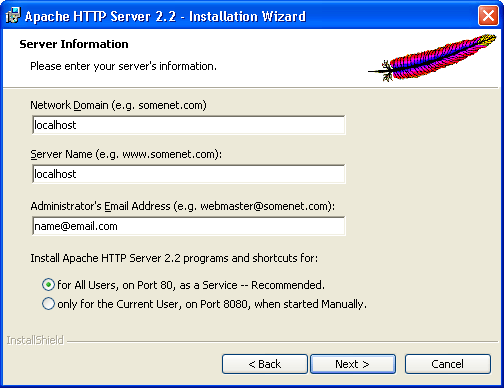
Once downloaded, run it and follow the prompts. For the network domain and server name, enter localhost. For the administrator email address, enter whatever you would like. These can be changed later easily.
Once done, open your web browser and navigate to http://localhost/. It should display a page that says It works! in large text. Now that was easy!
PHP is not a server like Apache; it is just a handler for .php files. Your Apache server uses the PHP module to parse .php files. Download the PHP package from the PHP Windows download page. Choose the latest VC6 x86 Thread Safe installer ("Thread Safe" is required to use it as an Apache module).
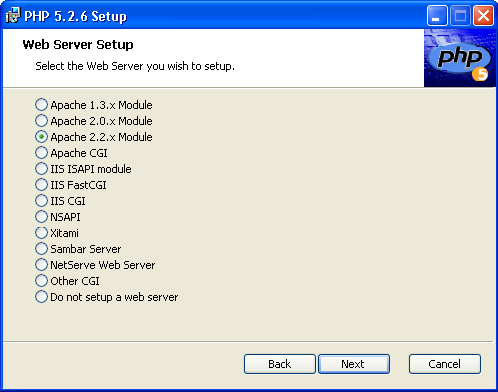
Once downloaded, run it and follow the prompts. When you get the selection window asking you how to install PHP, select the Apache module that matches your version of Apache:
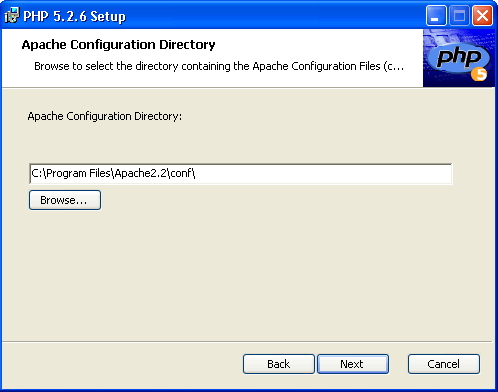
Now select the Apache conf directory, which is the directory that contains your Apache httpd.conf file and other important configuration files:
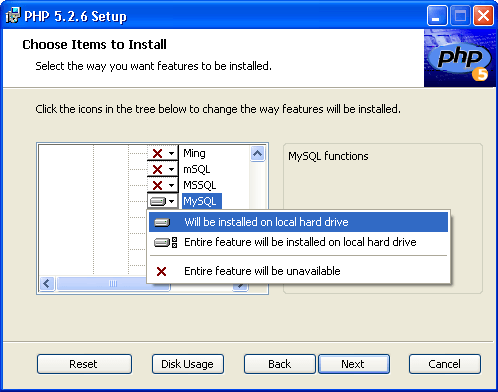
On the next page, click the plus sign next to Extensions to display a list of all the extensions that you can enable in PHP. The ones I commonly use are: GD2 (for image editing), Multi-byte String (for PHPMyAdmin), Mcrypt (for PHPMyAdmin), MySQL, MySQLi, and PDO (for MySQL).
You can make changes to this later if needed.
Now that PHP is installed, you need to restart the server before it will properly parse .php files. This is because PHP edited the Apache httpd.conf file, and as you'll learn later, any changes to the httpd.conf file (or other .conf files) won't take effect until after you restart the server.
There should be a new icon in your start bar that opens the Apache Service Monitor . From here, you can Restart the server.
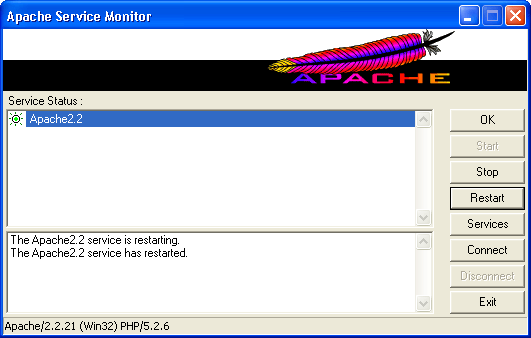
If you get an error related to "php5apache2_2.dll" or similar and the server won't restart, see the "Syntax error on restart / php5apache2_2.dll" section below (you can continue to install MySQL or do it after fixing the error).
Download the latest MySQL release from the Windows MySQL download page. It should automatically detect the version you need (EX: Windows (x86, 32-bit), MSI Installer). When it asks you to register or enter a user login, just scroll down to see the list of download sites.
Run the installer and follow the prompts. When asked the setup type, choose Server only, unless you want MySQL Workbench and other development tools/plug-ins. You don't need them if you use PHPMyAdmin or are comfortable with the command line interface.
After installation it will ask the configuration. Select Developer Machine so that MySQL uses fewer resources. On the next page, it will ask for the Port Number and Windows Service Name. You can leave these at their default settings. For the MySQL Root Password, enter a password. This will be what you use to connect to your MySQL database.
Now you're done installing MySQL.
The main configuration file for your Apache server is the httpd.conf file, which is a plain text file that resides in the conf folder inside your Apache install (EX: C:/Program Files/Apache2.2/conf/httpd.conf). There should be a shortcut to this file in the Apache folder in your Start Menu. You can edit this file with a plain text editor such as Notepad. There are many comments throughout the file (denoted by the # symbol) that explain briefly what everything does. I suggest becoming very familiar with this file, but not editing anything yet unless you are sure of what you are doing.
Also note that any changes you make will require a restart of the Apache server before they can take effect.
If you attempt to restart the server and it gives you this error, PHP may not have correctly set the directory in the Apache httpd.conf file. Open httpd.conf, scroll to the bottom, and you will see that the PHP install added a few lines. if these lines do not properly point to your PHP directory and the php5 module, you'll need to set them. Here is what the two lines look like for me:
Currently, your server is setup to use the htdocs folder that resides inside your Apache install folder as the Document Root (EX: C:/Program Files/Apache2.2/htdocs). What this means is that when you type localhost into your browser, it runs the website files that exist in the htdocs folder. With a fresh install of Apache, there should only be one index.html file in there with the "It works!" message.
You can change your document root to something else or leave it as is. I use C:/wwwroot because I am used to IIS and it is an easy path. If you decide to change it, you'll need to go into the httpd.conf file and find the line that looks something like this:
It may differ depending on your install path. Change the path that is inside the quotes to your desired path. This is what I use:
There is another line you must change if you change your Document Root. Just below that look for:
And change it accordingly.
Apache is set by default to use index.html as an index file, but chances are you'll want index.php to also be one. Search for the block that looks like this:
And add in index.php and any other index files you want. If a user browsers to a folder, index files are ran instead of that user seeing the directory contents or a forbidden message. Example:
So what is this localhost business anyway? Localhost is just a name that Windows knows points to your local IP address (127.0.0.1). You can also type in 127.0.0.1 to get to your document root as well. Windows knows that localhost points to 127.0.0.1 because it is set in the hosts file. You can edit the file if you want to change the name "localhost" or add additional names that will point to your local machine.
The hosts file is located in this folder: C:/Windows/System32/drivers/etc/ (for Windows XP, Vista, and 7). Note that the hosts file does not have an extension, but it is just a plain text file. You may have to select Notepad or Wordpad manually to open it. Once open, you should see a bunch of comments explaining the file and the line:
What the hosts file does (as the comments indicate) is map names to IP addresses, one per line. So when you type localhost into your browser, Windows knows to access 127.0.0.1. You can point any name to any IP address (but not folders). Try editing it to this:
Now go to your browser and type in myhost. It should have the same effect as localhost, since it points to the same IP.
If you are on a network and have multiple computers with static local IP addresses, you can map names to their IPs as well and access any web server that is running on them by typing that in instead of the IP address.
Now this may not seem very useful at the moment, but later when you want to set up virtual hosts you will make good use of the hosts file.
If you are experiencing problems and you're sure your settings are correct, try restarting your computer (which restarts the server) and then clearing your browser cache.
If you messed up your Apache configuration files, there is an original folder inside the conf folder that contains original versions of all the files.
Here are some things you can work on next. They aren't covered in this guide or my others guides (yet) but if you search Google there should be plenty of information:
- Download the latest PHPMyAdmin so you can manage your MySQL databases using a graphical interface.
- Create virtual hosts in Apache (virtual domains) so you can run multiple sites without putting them into folders.
- Use mod_rewrite to clean up your URLs and make nice search-engine-optimized links.
Here's a basic guide on setting up an Apache server with PHP and MySQL on your Windows computer to use as a developer environment.
If you currently have IIS setup with MySQL, you can leave MySQL installed. You will want to remove IIS prior to installing Apache though. It would require configuring beyond the scope of this guide to use both IIS & Apache concurrently. To remove IIS, you will want to choose the "Add/Remove Windows Components" or similar link on your respective version of Windows, which would be in the "Add/Remove Programs" or "Programs and Features" control panel.
If you have PHP currently with IIS, you may also be able to leave it installed (and just reconfigure it using the original installer), but it is likely that the version you originally downloaded for IIS won't be the best one to use for Apache, or you may not have the installer anymore. I suggest uninstalling PHP and starting fresh.
Now to the setup:
Apache
Download the latest Windows release of the server from the Apache download page. You'll probably want the one called Win32 Binary without crypto (no mod_ssl) (MSI Installer).
Once downloaded, run it and follow the prompts. For the network domain and server name, enter localhost. For the administrator email address, enter whatever you would like. These can be changed later easily.
Once done, open your web browser and navigate to http://localhost/. It should display a page that says It works! in large text. Now that was easy!
PHP
PHP is not a server like Apache; it is just a handler for .php files. Your Apache server uses the PHP module to parse .php files. Download the PHP package from the PHP Windows download page. Choose the latest VC6 x86 Thread Safe installer ("Thread Safe" is required to use it as an Apache module).
Once downloaded, run it and follow the prompts. When you get the selection window asking you how to install PHP, select the Apache module that matches your version of Apache:
Now select the Apache conf directory, which is the directory that contains your Apache httpd.conf file and other important configuration files:
On the next page, click the plus sign next to Extensions to display a list of all the extensions that you can enable in PHP. The ones I commonly use are: GD2 (for image editing), Multi-byte String (for PHPMyAdmin), Mcrypt (for PHPMyAdmin), MySQL, MySQLi, and PDO (for MySQL).
You can make changes to this later if needed.
Now that PHP is installed, you need to restart the server before it will properly parse .php files. This is because PHP edited the Apache httpd.conf file, and as you'll learn later, any changes to the httpd.conf file (or other .conf files) won't take effect until after you restart the server.
There should be a new icon in your start bar that opens the Apache Service Monitor
. From here, you can Restart the server.If you get an error related to "php5apache2_2.dll" or similar and the server won't restart, see the "Syntax error on restart / php5apache2_2.dll" section below (you can continue to install MySQL or do it after fixing the error).
MySQL
Download the latest MySQL release from the Windows MySQL download page. It should automatically detect the version you need (EX: Windows (x86, 32-bit), MSI Installer). When it asks you to register or enter a user login, just scroll down to see the list of download sites.
Run the installer and follow the prompts. When asked the setup type, choose Server only, unless you want MySQL Workbench and other development tools/plug-ins. You don't need them if you use PHPMyAdmin or are comfortable with the command line interface.
After installation it will ask the configuration. Select Developer Machine so that MySQL uses fewer resources. On the next page, it will ask for the Port Number and Windows Service Name. You can leave these at their default settings. For the MySQL Root Password, enter a password. This will be what you use to connect to your MySQL database.
Now you're done installing MySQL.
Configuring your Server (httpd.conf)
The main configuration file for your Apache server is the httpd.conf file, which is a plain text file that resides in the conf folder inside your Apache install (EX: C:/Program Files/Apache2.2/conf/httpd.conf). There should be a shortcut to this file in the Apache folder in your Start Menu. You can edit this file with a plain text editor such as Notepad. There are many comments throughout the file (denoted by the # symbol) that explain briefly what everything does. I suggest becoming very familiar with this file, but not editing anything yet unless you are sure of what you are doing.
Also note that any changes you make will require a restart of the Apache server before they can take effect.
Syntax error on restart / php5apache2_2.dll
If you attempt to restart the server and it gives you this error, PHP may not have correctly set the directory in the Apache httpd.conf file. Open httpd.conf, scroll to the bottom, and you will see that the PHP install added a few lines. if these lines do not properly point to your PHP directory and the php5 module, you'll need to set them. Here is what the two lines look like for me:
PHPIniDir "C:\Program Files\PHP"
LoadModule php5_module "C:\Program Files\PHP\php5apache2_2.dll"
Document Root
Currently, your server is setup to use the htdocs folder that resides inside your Apache install folder as the Document Root (EX: C:/Program Files/Apache2.2/htdocs). What this means is that when you type localhost into your browser, it runs the website files that exist in the htdocs folder. With a fresh install of Apache, there should only be one index.html file in there with the "It works!" message.
You can change your document root to something else or leave it as is. I use C:/wwwroot because I am used to IIS and it is an easy path. If you decide to change it, you'll need to go into the httpd.conf file and find the line that looks something like this:
DocumentRoot "C:/Program Files/Apache2.2/htdocs"It may differ depending on your install path. Change the path that is inside the quotes to your desired path. This is what I use:
DocumentRoot "C:/wwwroot"There is another line you must change if you change your Document Root. Just below that look for:
<Directory "C:/Program Files/Apache2.2/htdocs">And change it accordingly.
Directory Index
Apache is set by default to use index.html as an index file, but chances are you'll want index.php to also be one. Search for the block that looks like this:
<IfModule dir_module>
   DirectoryIndex index.html
</IfModule>
And add in index.php and any other index files you want. If a user browsers to a folder, index files are ran instead of that user seeing the directory contents or a forbidden message. Example:
<IfModule dir_module>
   DirectoryIndex index.php index.html index.htm
</IfModule>
Localhost and Windows hosts file
So what is this localhost business anyway? Localhost is just a name that Windows knows points to your local IP address (127.0.0.1). You can also type in 127.0.0.1 to get to your document root as well. Windows knows that localhost points to 127.0.0.1 because it is set in the hosts file. You can edit the file if you want to change the name "localhost" or add additional names that will point to your local machine.
The hosts file is located in this folder: C:/Windows/System32/drivers/etc/ (for Windows XP, Vista, and 7). Note that the hosts file does not have an extension, but it is just a plain text file. You may have to select Notepad or Wordpad manually to open it. Once open, you should see a bunch of comments explaining the file and the line:
127.0.0.1 localhostWhat the hosts file does (as the comments indicate) is map names to IP addresses, one per line. So when you type localhost into your browser, Windows knows to access 127.0.0.1. You can point any name to any IP address (but not folders). Try editing it to this:
127.0.0.1 localhost
127.0.0.1 myhost
Now go to your browser and type in myhost. It should have the same effect as localhost, since it points to the same IP.
If you are on a network and have multiple computers with static local IP addresses, you can map names to their IPs as well and access any web server that is running on them by typing that in instead of the IP address.
Now this may not seem very useful at the moment, but later when you want to set up virtual hosts you will make good use of the hosts file.
Troubleshooting
If you are experiencing problems and you're sure your settings are correct, try restarting your computer (which restarts the server) and then clearing your browser cache.
If you messed up your Apache configuration files, there is an original folder inside the conf folder that contains original versions of all the files.
Next up
Here are some things you can work on next. They aren't covered in this guide or my others guides (yet) but if you search Google there should be plenty of information:
- Download the latest PHPMyAdmin so you can manage your MySQL databases using a graphical interface.
- Create virtual hosts in Apache (virtual domains) so you can run multiple sites without putting them into folders.
- Use mod_rewrite to clean up your URLs and make nice search-engine-optimized links.