Archive
This post is archived and may contain outdated information. It has been set to 'noindex' and should stop showing up in search results.
This post is archived and may contain outdated information. It has been set to 'noindex' and should stop showing up in search results.
How to Update Android Nexus Phone or Tablet with Factory Image using Windows PC
Apr 13, 2015MobileComments (0)
If your Nexus device feels buggy or sluggish after an OTA (over-the-air) Android update, or you want to restore your Nexus device to its factory condition, here is a quick guide for flashing a stock Android image using a Windows PC and USB cable. It only requires basic command prompt knowledge and a desire to learn more about Android.
Keep in mind that doing this will wipe any user data and apps you have, so be sure to backup everything first (pictures, downloads, app data, etc). Make sure your phone battery charge is full or close to it, and you aren't doing anything else on your PC that might cause it to crash. If you need a new USB cable, I recommend this one.
The factory image is the stock operating system and firmware that comes directly from Google. Google offers every version of stock Android for their Nexus devices available to download on their factory image webpage.
Step 1. Download the Factory Image
Go to the factory image website and download the latest factory image for your device. Once downloaded, use 7-Zip to extract the archive twice until you have a folder with several files in it, including a file called "flash-all.bat". Leave this folder on your desktop or downloads folder for now and we'll come back to it.
Step 2: Get ADB and Fastboot for Windows
These two programs, ADB (Android Debug Bridge) and Fastboot, allow you to control and install software to your Android device from your Windows computer. You'll need to get both of them. Please read this thread for some basic information about these tools and an installer for them.
Step 3: Connect your Device
Connect your Nexus phone or tablet to your PC using the USB cable. If Windows does not recognize it, you may need to get the Google Windows USB Driver first.
Once connected and recognized, go into your device and turn on USB debugging. If you don't know how to turn on debugging, follow this quick guide.
Now open up a command prompt and type:
Your device should display a pop up asking you if you want to allow your PC access through USB. Once confirmed, your device ID should show up in the command prompt like this (your ID will be different):
If adb shows no devices, and your device is connected, you may need to update the USB driver manually in Windows Device Manager (run devmgmt.msc). Sometimes even when Windows detects your device, ADB cannot.
Step 4: Unlock the bootloader
Type the following command into the command prompt, which will reboot your device:
Your phone or tablet should now be in bootloader mode. You can unlock it now, which will wipe user data (you must unlock the device in order to flash the factory image). Type this command into the command prompt:
A warning will come up on the device screen. Confirm it and it will wipe and unlock the device. Wait for it to complete.
Step 5: Flash the Factory Image
On your PC, go into your factory image folder and run the "flash-all.bat" script. This will begin the process of installing the factory image onto your device. It will likely take between 3 minutes to 15 minutes depending on your device. Once done, it will reboot automatically and you can go through the normal Google setup.
Step 6: Relock Your Device (Optional)
Now that you have your device back up and running you can choose to relock it. Go to step 4 and follow the instructions to reboot it into the bootloader. Use this fastboot command instead though:
You do not need to relock your phone and can leave it unlocked, but it could present a security issue as malicious software could be flashed onto it that has root access.
Locking the phone usually does not wipe the data the same way unlocking it does, but on some devices it may wipe the phone.
Keep in mind that doing this will wipe any user data and apps you have, so be sure to backup everything first (pictures, downloads, app data, etc). Make sure your phone battery charge is full or close to it, and you aren't doing anything else on your PC that might cause it to crash. If you need a new USB cable, I recommend this one.
What is a Factory Image?
The factory image is the stock operating system and firmware that comes directly from Google. Google offers every version of stock Android for their Nexus devices available to download on their factory image webpage.
Benefits to Flashing a Factory Image
- Avoid any bugs or odd behavior caused by upgrading an existing Android install.
- Get the latest version of Android before receiving an update notification.
- No messing around in the device recovery or using button combinations to boot.
- Revert to stock from a custom ROM with ease.
Step-by-Step Guide
Step 1. Download the Factory Image
Go to the factory image website and download the latest factory image for your device. Once downloaded, use 7-Zip to extract the archive twice until you have a folder with several files in it, including a file called "flash-all.bat". Leave this folder on your desktop or downloads folder for now and we'll come back to it.
Step 2: Get ADB and Fastboot for Windows
These two programs, ADB (Android Debug Bridge) and Fastboot, allow you to control and install software to your Android device from your Windows computer. You'll need to get both of them. Please read this thread for some basic information about these tools and an installer for them.
Step 3: Connect your Device
Connect your Nexus phone or tablet to your PC using the USB cable. If Windows does not recognize it, you may need to get the Google Windows USB Driver first.
Once connected and recognized, go into your device and turn on USB debugging. If you don't know how to turn on debugging, follow this quick guide.
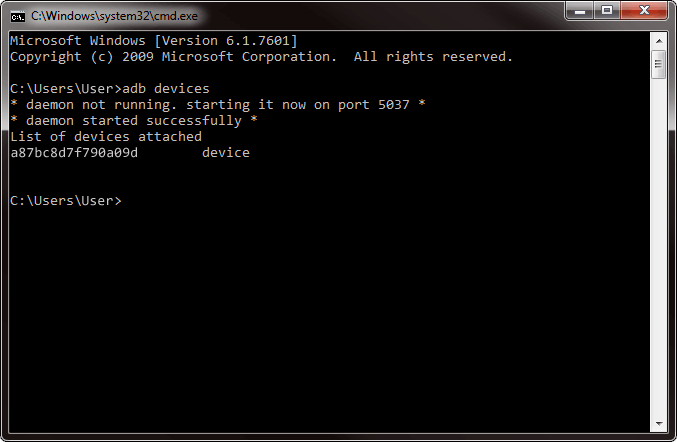
Now open up a command prompt and type:
adb devicesYour device should display a pop up asking you if you want to allow your PC access through USB. Once confirmed, your device ID should show up in the command prompt like this (your ID will be different):
If adb shows no devices, and your device is connected, you may need to update the USB driver manually in Windows Device Manager (run devmgmt.msc). Sometimes even when Windows detects your device, ADB cannot.
Step 4: Unlock the bootloader
Type the following command into the command prompt, which will reboot your device:
adb reboot bootloaderYour phone or tablet should now be in bootloader mode. You can unlock it now, which will wipe user data (you must unlock the device in order to flash the factory image). Type this command into the command prompt:
fastboot oem unlockA warning will come up on the device screen. Confirm it and it will wipe and unlock the device. Wait for it to complete.
Step 5: Flash the Factory Image
On your PC, go into your factory image folder and run the "flash-all.bat" script. This will begin the process of installing the factory image onto your device. It will likely take between 3 minutes to 15 minutes depending on your device. Once done, it will reboot automatically and you can go through the normal Google setup.
Step 6: Relock Your Device (Optional)
Now that you have your device back up and running you can choose to relock it. Go to step 4 and follow the instructions to reboot it into the bootloader. Use this fastboot command instead though:
fastboot oem lockYou do not need to relock your phone and can leave it unlocked, but it could present a security issue as malicious software could be flashed onto it that has root access.
Locking the phone usually does not wipe the data the same way unlocking it does, but on some devices it may wipe the phone.